
Salt Lake City Stars vs Maine Celtics

Maine CelticsCelticsMNE
13-15
107
13-15
Final
| 1 | 2 | 3 | 4 | T | |
|---|---|---|---|---|---|
Celtics MNE | 27 | 27 | 26 | 27 | 107 |
Stars SLC | 31 | 39 | 30 | 23 | 123 |

Salt Lake City StarsStarsSLC
12-15
123
12-15
Game Leaders


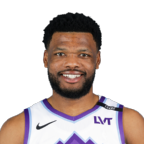
29
R. Harper Jr.#13
9/23 FG, 3/3 FT
29
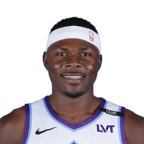
32
E. Harkless#16
10/19 FG, 6/6 FT
32

12
A. Williams#77
8 DREB, 4 OREB
12
17
O. Tshiebwe#34
13 DREB, 4 OREB
17

8
M. Shulga#44
4 TO, 32 MIN
8

7
S. East II#55
5 TO, 30 MIN
7
Team Stats

MNE

SLC
40% (37-93)
Field Goal %
45% (44-97)
34% (18-53)
Three Point %
28% (11-40)
80% (8-10)
Free Throw %
92% (12-13)
17
Turnovers
21
36
Rebounds
58
14%
Percent Led
82%
8
Largest Lead
22
Game Information
Orlando, FL
Referee:Nate Cearley
Referee:JP Primm
Referee:Ashley Birch
Game Flow

--MNE
6Lead Changes
--SLC
Shot Chart

- Mo Bamba misses 4-foot hook shot
- Mo Bamba misses layup
- Max Shulga misses 28-foot three point jumper
- Elijah Harkless misses hook shot
- Kendall Brown misses 13-foot fade away jump shot
- Elijah Harkless makes driving layup
- Ron Harper Jr. makes 27-foot three pointer (Max Shulga assists)
- Max Abmas misses driving floating jump shot
- Jalen Bridges misses 23-foot three point jumper
- Elijah Harkless makes running layup
- Max Shulga misses 26-foot three point jumper
- Ron Harper Jr. misses 27-foot three point pullup jump shot
- Mo Bamba misses 27-foot three point jumper
- Kendall Brown makes 25-foot three point jumper (Max Shulga assists)
- Max Abmas makes 17-foot pullup jump shot
- Kendall Brown misses 23-foot three point jumper
- Ron Harper Jr. makes free throw 1 for 2
- Jalen Bridges makes free throw 1 for 2
- Max Abmas misses 30-foot three point jumper
- Ron Harper Jr. makes 29-foot running jump shot (Kendall Brown assists)
- Mo Bamba misses 22-foot three point jumper
- John Tonje makes free throw 1 for 2
- Ron Harper Jr. makes 28-foot three point jumper (Max Shulga assists)
- Sean East II misses 20-foot step back jumpshot
- Ron Harper Jr. misses 27-foot three point jumper
- John Tonje makes 23-foot three point jumper (Cam McGriff assists)
- Aaron Scott makes free throw 1 for 2
- John Tonje makes 24-foot three point jumper (Sean East II assists)
- Hason Ward misses 10-foot floating jump shot
- Cam McGriff makes 26-foot three point jumper (Matthew Murrell assists)
- Kendall Brown makes 4-foot layup (Hason Ward assists)
- John Tonje makes free throw 1 for 2
- Max Shulga makes 12-foot two point shot
- Sean East II misses 25-foot three point step back jumpshot
- Aaron Scott misses 23-foot three point jumper
- Matthew Murrell makes 25-foot three point jumper (Cam McGriff assists)
- Jalen Bridges misses 25-foot three point jumper
- Aaron Scott misses 27-foot three point jumper
- Cam McGriff makes driving layup (Sean East II assists)
- Aaron Scott misses 24-foot three point jumper
- Mo Bamba misses 23-foot three point jumper
- Matthew Murrell misses 25-foot three point jumper
- Jalen Bridges misses 26-foot three point shot
- Hayden Gray makes 24-foot running jump shot (Max Shulga assists)
- Sean East II misses 18-foot pullup jump shot
- Max Shulga misses 25-foot three point jumper
- Sean East II makes 9-foot running jump shot
- Max Shulga misses 24-foot three point jumper
- Sean East II makes 25-foot three point jumper (Cam McGriff assists)
- Jalen Bridges makes free throw 1 for 2
- Cam McGriff makes 14-foot driving floating jump shot (Sean East II assists)
- Jalen Bridges misses driving layup
- Amari Williams makes two point shot
- Justin Harmon makes 25-foot three point jumper (Sean East II assists)
- Max Shulga makes 7-foot two point shot
- Sean East II makes 11-foot two point shot
- Max Shulga makes 4-foot layup (Amari Williams assists)
- Sean East II makes free throw 1 for 3
- Amari Williams misses driving layup
- Amari Williams makes tip shot
- John Tonje misses driving layup
- Justin Harmon makes 3-foot running dunk
- Ron Harper Jr. misses 26-foot three point jumper
- Ron Harper Jr. makes 26-foot three point jumper (Max Shulga assists)
- Oscar Tshiebwe makes 3-foot dunk (Sean East II assists)
- Ron Harper Jr. misses 26-foot three point jumper
- John Tonje makes layup (Max Abmas assists)
- Stefan Todorovic misses 27-foot three point jumper
- Sean East II makes 16-foot pullup jump shot
- Jalen Bridges makes 23-foot three point jumper (Max Shulga assists)
- Sean East II misses 24-foot three point pullup jump shot
- Max Shulga misses 25-foot three point jumper
- Oscar Tshiebwe makes layup (Max Abmas assists)
- Hason Ward makes 5-foot running dunk
- Elijah Harkless makes driving layup
- Elijah Harkless makes free throw 1 for 1
- Ron Harper Jr. misses 27-foot three point step back jumpshot
- Max Abmas misses 25-foot three point pullup jump shot
- Oscar Tshiebwe makes free throw 1 for 2
- Max Shulga makes 11-foot jump bank shot
- Elijah Harkless makes free throw 1 for 2
- Ron Harper Jr. makes driving layup
- Max Abmas misses 25-foot three point jumper
- Max Abmas makes layup (Matthew Murrell assists)
- Ron Harper Jr. misses 26-foot three point pullup jump shot
- Hank Morgan misses 24-foot three point jumper
- Elijah Harkless makes free throw 1 for 3
- Ron Harper Jr. misses 26-foot three point jumper
- Elijah Harkless misses 25-foot three point jumper
- Mo Bamba misses dunk
- Kendall Brown makes 3-foot dunk (Ron Harper Jr. assists)
- Mo Bamba makes 25-foot three point jumper (Matthew Murrell assists)
- Ron Harper Jr. makes free throw 1 for 2
- Sean East II misses driving layup
- Matthew Murrell misses 23-foot three point jumper
- Ron Harper Jr. misses running layup
- Jalen Bridges misses tip shot
- Sean East II makes 6-foot pullup jump shot
- Hayden Gray misses 27-foot three point jumper
- Mo Bamba misses 24-foot three point jumper
- Jalen Bridges makes 25-foot three point jumper (Kendall Brown assists)
- Sean East II misses 24-foot three point step back jumpshot
- Elijah Harkless misses 37-foot three point jumper
- Elijah Harkless misses 24-foot running jump shot
- Elijah Harkless makes 9-foot jumper
- Max Shulga misses 26-foot three point jumper
- Max Shulga misses layup
- Sean East II misses 25-foot running jump shot
- Elijah Harkless makes free throw 1 for 2
- Ron Harper Jr. misses 23-foot three point jumper
- Kendall Brown misses 24-foot three point jumper
- Elijah Harkless makes driving layup
- Kendall Brown makes 26-foot three point jumper (Amari Williams assists)
- Elijah Harkless makes 26-foot three point jumper (Max Abmas assists)
- Jalen Bridges makes 26-foot three point step back jumpshot (Max Shulga assists)
- Oscar Tshiebwe makes 6-foot two point shot (Elijah Harkless assists)
- Amari Williams misses driving layup
- Max Abmas makes 25-foot three point step back jumpshot
- Jalen Bridges makes 24-foot three point jumper (Ron Harper Jr. assists)
- Oscar Tshiebwe misses layup
- Cam McGriff makes 27-foot three point step back jumpshot
- Ron Harper Jr. misses driving dunk
- Max Abmas misses 27-foot running jump shot
- Elijah Harkless makes tip in dunk
- Ron Harper Jr. makes two point shot (Hayden Gray assists)
- Cam McGriff misses driving floating jump shot
- Jalen Bridges misses 27-foot three point jumper
- John Tonje makes two point shot (Matthew Murrell assists)
- Ron Harper Jr. makes 25-foot three point jumper (Jalen Bridges assists)
- Jalen Bridges makes 25-foot running jump shot
- Cam McGriff misses 24-foot three point jumper
- John Tonje misses 25-foot three point jumper
- Hason Ward misses driving layup
- Cam McGriff makes free throw 1 for 2
- Justin Harmon misses driving layup
- Hason Ward makes 10-foot driving floating jump shot (Ron Harper Jr. assists)
- Ron Harper Jr. misses 25-foot three point pullup jump shot
- Sean East II misses 26-foot three point pullup jump shot
- Ron Harper Jr. makes running layup
- Matthew Murrell misses 25-foot three point jumper
- Max Shulga makes 25-foot three point jumper (Hayden Gray assists)
- Sean East II misses 16-foot pullup jump shot
- Justin Harmon makes tip shot
- Hayden Gray misses 25-foot three point jumper
- Justin Harmon misses running layup
- Hayden Gray makes running layup
- Matthew Murrell makes two point shot (Sean East II assists)
- Sean East II misses running pullup jump shot
- Sean East II makes 10-foot floating jump shot
- Hayden Gray misses two point shot
- Cam McGriff makes 20-foot step back jumpshot
- Max Shulga misses free throw 1 for 2
- Matthew Murrell makes 27-foot three point jumper (Sean East II assists)
- Robert Woodard II misses two point shot
- Robert Woodard II misses running pullup jump shot
- Hayden Gray makes two point shot (Amari Williams assists)
- Mo Bamba misses 15-foot pullup jump shot
- Justin Harmon misses tip shot
- Jalen Bridges misses 24-foot running jump shot
- Cam McGriff misses 22-foot three point jumper
- Ron Harper Jr. misses 23-foot three point jumper
- Hayden Gray misses running layup
- Max Abmas misses 6-foot jumper
- Jalen Bridges makes 26-foot running jump shot (Ron Harper Jr. assists)
- Sean East II makes 16-foot pullup jump shot
- Ron Harper Jr. misses driving floating jump shot
- Sean East II makes 12-foot pullup jump shot
- Amari Williams misses layup
- Elijah Harkless misses 14-foot step back jumpshot
- Ron Harper Jr. makes 5-foot two point shot
- Max Abmas misses 23-foot three point jumper
- Kendall Brown makes two point shot (Ron Harper Jr. assists)
- Elijah Harkless makes two point shot
- Elijah Harkless makes free throw 1 for 1
- Ron Harper Jr. makes free throw 1 for 2
- Max Abmas makes free throw 1 for 2
- Ron Harper Jr. misses 25-foot three point jumper
- Oscar Tshiebwe makes 11-foot jumper (Hank Morgan assists)
- Kendall Brown misses free throw 1 for 2
- Kendall Brown misses driving floating jump shot
- Elijah Harkless misses layup
- Oscar Tshiebwe makes 6-foot dunk
- Hason Ward misses 8-foot two point shot
- Elijah Harkless misses 26-foot three point jumper
- Hayden Gray makes 26-foot three point jumper (Max Shulga assists)
- Oscar Tshiebwe makes 6-foot two point shot
- Hayden Gray makes free throw 1 for 2
- Matthew Murrell misses 26-foot three point jumper
- Kendall Brown makes alley oop layup (Hayden Gray assists)
- Elijah Harkless makes free throw 1 for 2
- Jalen Bridges makes 25-foot three point jumper (Hayden Gray assists)
- Elijah Harkless misses layup
- Oscar Tshiebwe misses free throw 1 for 2
- Amari Williams misses alley oop layup
- Elijah Harkless misses 25-foot three point jumper
- Sean East II makes layup (Mo Bamba assists)
- Jalen Bridges makes 23-foot three point jumper (Hayden Gray assists)
- Elijah Harkless makes driving layup
- Hayden Gray misses 26-foot three point jumper
- Matthew Murrell misses 22-foot three point jumper
- Kendall Brown misses 23-foot three point jumper
- Kendall Brown makes running layup
- Kendall Brown makes free throw 1 of 1
- John Tonje misses 24-foot three point jumper
- Hayden Gray misses 25-foot running jump shot
- Elijah Harkless makes 5-foot driving dunk
- Jalen Bridges misses 24-foot three point jumper
Shot Made
Shot Missed
Shot Made
Shot Missed
Data is currently unavailable.
Matchups
2025-26 Standings
NBA G League
| Eastern Conference | W | L | PCT | GB | STRK |
|---|---|---|---|---|---|
| Greensboro | 19 | 7 | .731 | - | L1 |
| Osceola | 18 | 7 | .720 | 0.5 | W1 |
| Cleveland | 17 | 8 | .680 | 1.5 | W1 |
| Long Island | 17 | 11 | .607 | 3 | W2 |
| Raptors | 16 | 11 | .593 | 3.5 | L3 |
| Delaware | 14 | 10 | .583 | 4 | W3 |
| Motor City | 14 | 12 | .538 | 5 | W1 |
| Noblesville | 14 | 13 | .519 | 5.5 | L4 |
| Capital City | 13 | 14 | .481 | 6.5 | L1 |
| Windy City | 12 | 13 | .480 | 6.5 | L2 |
| Maine | 13 | 15 | .464 | 7 | W1 |
| Birmingham | 10 | 17 | .370 | 9.5 | W2 |
| Westchester | 9 | 17 | .346 | 10 | L2 |
| Grand Rapids | 9 | 18 | .333 | 10.5 | W1 |
| Wisconsin | 8 | 18 | .308 | 11 | W1 |
| College Park | 7 | 20 | .259 | 12.5 | L2 |
| Western Conference | W | L | PCT | GB | STRK |
|---|---|---|---|---|---|
| Mexico City | 18 | 8 | .692 | - | W2 |
| Rio Grande Valley | 17 | 8 | .680 | 0.5 | W3 |
| South Bay | 17 | 8 | .680 | 0.5 | W7 |
| Stockton | 16 | 8 | .667 | 1 | W1 |
| Austin | 16 | 9 | .640 | 1.5 | W2 |
| Iowa | 15 | 11 | .577 | 3 | W2 |
| Rip City | 14 | 11 | .560 | 3.5 | L1 |
| Sioux Falls | 14 | 13 | .519 | 4.5 | L1 |
| Santa Cruz | 12 | 12 | .500 | 5 | L1 |
| San Diego | 13 | 15 | .464 | 6 | L1 |
| Salt Lake City | 12 | 15 | .444 | 6.5 | W1 |
| Valley | 9 | 17 | .346 | 9 | L1 |
| Oklahoma City | 9 | 18 | .333 | 9.5 | L2 |
| Texas | 6 | 19 | .240 | 11.5 | L9 |
| Memphis | 6 | 21 | .222 | 12.5 | W1 |
NBA G League News
Taylor, Garcia lead Capitanes past Boom
Behind strong performances from Wade Taylor IV and Andersson Garcia, the Mexico City Capitanes defeated the Noblesville Boom 122-110.
4h
Wheeler, Morales lead Magic past Skyforce in overtime thriller
The Osceola Magic defeated the Sioux Falls Skyforce 113-106 in overtime Tuesday night.
15h
Colby Jones scores 25 off bench to power Hustle over Legends
Colby Jones scored 25 points off the bench, including five 3-pointers, to lead the Memphis Hustle to a 135-113 victory over the Texas Legends on Tuesday night at the Landers Center in Southaven, Mississippi.
16h