


Game Information
Adelaide Oval
| fourth Quarter | |||
|---|---|---|---|
| Time | Team | Play | Score |
| 31:28 |  | Z. Butters Behind | 133 - 70 |
| 27:59 | | J. Lukosius Goal | 132 - 70 |
| 25:40 |  | J. Caldwell Goal | 126 - 70 |
| 23:09 | | N. Caddy Goal | 126 - 64 |
| 19:55 | | J. Horne-Francis Behind | 126 - 58 |
| 18:18 | | N. Caddy Behind | 125 - 58 |
| 16:48 | | I. Kako Goal | 125 - 57 |
| 15:30 | | N. Caddy Goal | 125 - 51 |
| 13:31 | | D. Byrne-Jones Goal | 125 - 45 |
| 11:40 | | A. Perkins Goal | 119 - 45 |
| 9:46 | | Z. Butters Behind | 119 - 39 |
| 8:13 | | J. Lukosius Goal | 118 - 39 |
| 6:50 | | Rushed | 112 - 39 |
| 4:34 | | J. Burgoyne Goal | 112 - 38 |
| 1:33 | | J. Watkins Goal | 106 - 38 |
| third Quarter | |||
| Time | Team | Play | Score |
| 32:45 | | D. Byrne-Jones Behind | 100 - 38 |
| 28:36 | | J. Richards Goal | 99 - 38 |
| 27:35 | | J. Richards Behind | 93 - 38 |
| 25:44 | | I. Kako Behind | 92 - 38 |
| 23:57 | | C. Durdin Goal | 92 - 37 |
| 22:07 | | M. Georgiades Goal | 86 - 37 |
| 15:19 | | K. Langford Goal | 80 - 37 |
| 11:49 | | I. Kako Behind | 80 - 31 |
| 9:28 | | M. Bergman Goal | 80 - 30 |
| 6:56 | | W. Drew Goal | 74 - 30 |
| 3:35 | | N. Caddy Goal | 68 - 30 |
| 2:43 | | M. Georgiades Behind | 68 - 24 |
| 1:08 | | N. Caddy Goal | 67 - 24 |
| second Quarter | |||
| Time | Team | Play | Score |
| 30:06 | | Rushed | 67 - 18 |
| 27:12 | | C. Durdin Goal | 67 - 17 |
| 21:56 | | S. Durham Goal | 61 - 17 |
| 20:06 | | J. Lukosius Behind | 61 - 11 |
| 18:08 | | J. Horne-Francis Behind | 60 - 11 |
| 11:11 | | J. Richards Goal | 59 - 11 |
| 8:44 | | J. Berry Goal | 53 - 11 |
| 7:19 | | Rushed | 47 - 11 |
| 7:19 | | Rushed | 47 - 11 |
| 5:48 | | N. Caddy Behind | 47 - 10 |
| 1:35 | | J. Lukosius Goal | 47 - 9 |
| first Quarter | |||
| Time | Team | Play | Score |
| 29:43 | | I. Kako Behind | 41 - 9 |
| 28:19 | | I. Kako Behind | 41 - 8 |
| 26:17 | | W. Drew Behind | 41 - 7 |
| 24:36 | | J. Berry Goal | 40 - 7 |
| 23:33 | | J. Horne-Francis Goal | 34 - 7 |
| 21:57 | | J. Whitlock Behind | 28 - 7 |
| 18:36 | | J. Horne-Francis Goal | 27 - 7 |
| 16:34 | | J. Berry Behind | 21 - 7 |
| 15:18 | | E. Mackinlay Behind | 20 - 7 |
| 14:05 | | N. Caddy Behind | 19 - 7 |
| 12:54 | | J. Horne-Francis Goal | 19 - 6 |
| 10:10 | | J. Sweet Goal | 13 - 6 |
| 8:47 | | M. Georgiades Goal | 7 - 6 |
| 4:56 | | B. Fiorini Goal | 1 - 6 |
| 2:36 | | M. Georgiades Behind | 1 - 0 |
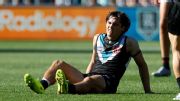
Port Adelaide captain Connor Rozee is helped from the field with a suspected hamstring injury against Essendon.
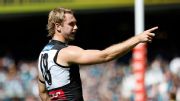
Jason Horne-Francis boots a trio of goals as Port Adelaide burst out of the blocks against Essendon.
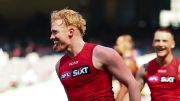
Fremantle Dockers star Caleb Serong ignites the home crowd with a skilful finish.
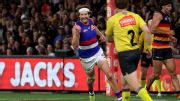
John Noble sends Richmond defenders sideways as a special solo play helps Gold Coast break away from the Tigers
Izak Rankine kicks a go-ahead goal from a tight angle under immense pressure as Adelaide storm back from four goals down
Oskar Baker snaps an outrageous goal from the boundary line to snatch victory for the Bulldogs in a final-term thriller.
| POS | Team | Pts. | % | Form |
|---|---|---|---|---|
| 1 |
 SUNS SUNS
|
12 | 191.0 | WWW |
| 2 |
 WB WB
|
12 | 137.2 | WWW |
| 3 |
 SYD SYD
|
8 | 139.5 | WWL |
| 4 |
 HAW HAW
|
8 | 118.1 | LWW |
| 5 |
 NMFC NMFC
|
4 | 168.7 | W |
| 6 |
 FRE FRE
|
4 | 121.1 | LW |
| 7 |
 PORT PORT
|
4 | 109.3 | LW |
| 8 |
 ADEL ADEL
|
4 | 104.6 | WL |
| 9 |
 COLL COLL
|
4 | 98.7 | WL |
| 10 |
 STK STK
|
4 | 92.3 | LLW |
| 11 |
 MELB MELB
|
4 | 84.4 | WL |
| 12 |
 GWS GWS
|
4 | 81.1 | WLL |
| 13 |
 GEEL GEEL
|
4 | 79.6 | LW |
| 14 |
 CARL CARL
|
4 | 70.9 | LW |
| 15 |
 BL BL
|
0 | 77.2 | LL |
| 16 |
 RICH RICH
|
0 | 64.5 | LL |
| 17 |
 WCE WCE
|
0 | 55.0 | L |
| 18 |
 ESS ESS
|
0 | 55.0 | LL |