Game Information
People First Stadium
| fourth Quarter | |||
|---|---|---|---|
| Time | Team | Play | Score |
| 29:03 |  | H. Sharp Behind | 104 - 85 |
| 27:25 | | J. Melksham Goal | 104 - 84 |
| 26:06 |  | Rushed | 104 - 78 |
| 24:18 | | B. King Goal | 103 - 78 |
| 21:22 | | J. Melksham Behind | 97 - 78 |
| 19:27 | | K. Pickett Goal | 97 - 77 |
| 18:10 | | B. Fritsch Goal | 97 - 71 |
| 15:55 | | B. Fritsch Behind | 97 - 65 |
| 12:52 | | J. Melksham Goal | 97 - 64 |
| 10:38 | | K. Pickett Goal | 97 - 58 |
| 9:56 | | J. Melksham Behind | 97 - 52 |
| 5:38 | | Rushed | 97 - 51 |
| 3:52 | | M. Jefferson Behind | 96 - 51 |
| 2:18 | | E. Read Behind | 96 - 50 |
| 0:51 | | J. Melksham Behind | 95 - 50 |
| third Quarter | |||
| Time | Team | Play | Score |
| 32:58 | | J. Walter Goal | 95 - 49 |
| 32:20 | | M. Jefferson Behind | 89 - 49 |
| 26:29 | | C. Petracca Behind | 89 - 48 |
| 23:07 | | J. Melksham Behind | 89 - 47 |
| 21:03 | | C. Budarick Goal | 89 - 46 |
| 19:28 | | B. Ainsworth Goal | 83 - 46 |
| 16:09 | | B. Fritsch Goal | 77 - 46 |
| 12:30 | | B. Ainsworth Goal | 77 - 40 |
| 10:40 | | B. Humphrey Goal | 71 - 40 |
| 9:57 | | J. Walter Behind | 65 - 40 |
| 6:42 | | E. Read Goal | 64 - 40 |
| 4:45 | | K. Pickett Goal | 58 - 40 |
| 3:29 | | B. Long Behind | 58 - 34 |
| 1:58 | | J. Melksham Behind | 57 - 34 |
| second Quarter | |||
| Time | Team | Play | Score |
| 32:42 | | J. Melksham Goal | 57 - 33 |
| 29:08 | | B. King Goal | 57 - 27 |
| 25:56 | | B. Humphrey Behind | 51 - 27 |
| 24:31 | | J. Melksham Goal | 50 - 27 |
| 22:46 | | M. Gawn Goal | 50 - 21 |
| 20:45 | | B. Long Goal | 50 - 15 |
| 15:42 | | J. Melksham Goal | 44 - 15 |
| 9:22 | | C. Petracca Behind | 44 - 9 |
| 7:38 | | B. King Goal | 44 - 8 |
| 5:31 | | E. Read Behind | 38 - 8 |
| 2:53 | | H. Petty Goal | 37 - 8 |
| 0:59 | | H. Petty Behind | 37 - 2 |
| first Quarter | |||
| Time | Team | Play | Score |
| 28:21 | | B. Ainsworth Behind | 37 - 1 |
| 25:21 | | T. Miller Goal | 36 - 1 |
| 23:03 | | B. Humphrey Goal | 30 - 1 |
| 20:26 | | J. Walter Goal | 24 - 1 |
| 18:33 | | S. Clohesy Behind | 18 - 1 |
| 17:09 | | J. Melksham Behind | 17 - 1 |
| 14:00 | | J. Jeffrey Goal | 17 - 0 |
| 10:16 | | B. King Behind | 11 - 0 |
| 9:20 | | Rushed | 10 - 0 |
| 7:36 | | B. Humphrey Behind | 9 - 0 |
| 5:03 | | B. Long Goal | 8 - 0 |
| 2:59 | | B. King Behind | 2 - 0 |
| 1:06 | | B. Fiorini Behind | 1 - 0 |
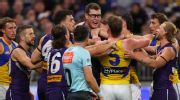
West Coast will consider approaching the AFL over the lack of apparent protection afforded to star midfielder Harley Reid.
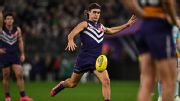
Murphy Reid converts a brilliant play with a long solo run ending with a long-range goal from outside the arc.
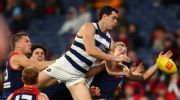
The Demons weren't able to stop Shannon Neale as he kicked three straight goals early in the game.
Jye Amiss kicked five goals and Murphy Reid produced a third-quarter clinic as Fremantle continued their western derby dominance with a 70-point win over West Coast at Optus Stadium.
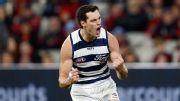
Melbourne's MCG golden run is over, losing to rejuvenated Geelong by 20 points.
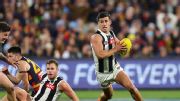
Nick Daicos kicks truly on the run to widen the margin for Collingwood.
| POS | Team | Pts. | % | Form |
|---|---|---|---|---|
| 1 |
 FRE FRE
|
68 | 146.0 | WLWWW |
| 2 |
 SYD SYD
|
52 | 128.3 | WLWLL |
| 3 |
 HAW HAW
|
50 | 118.4 | WWLWW |
| 4 |
 BL BL
|
48 | 117.8 | WWWWW |
| 5 |
 ADEL ADEL
|
48 | 113.7 | LWWWL |
| 6 |
 MELB MELB
|
48 | 107.8 | LWWWL |
| 7 |
 COLL COLL
|
46 | 107.6 | WWWWW |
| 8 |
 GEEL GEEL
|
44 | 116.5 | LLLWW |
| 9 |
 WB WB
|
44 | 93.2 | LWLWW |
| 10 |
 STK STK
|
32 | 104.0 | WLWWL |
| 11 |
 GWS GWS
|
32 | 101.3 | LLWWL |
| 12 |
 CARL CARL
|
32 | 91.1 | WWWLL |
| 13 |
 NMFC NMFC
|
32 | 90.9 | WWLLL |
| 14 |
 SUNS SUNS
|
28 | 95.3 | LLLLL |
| 15 |
 PORT PORT
|
24 | 99.3 | LWWLL |
| 16 |
 WCE WCE
|
16 | 70.1 | LLLLL |
| 17 |
 ESS ESS
|
8 | 67.9 | LLLLW |
| 18 |
 RICH RICH
|
8 | 61.7 | LLLLL |