


Game Information
Marvel Stadium
| fourth Quarter | |||
|---|---|---|---|
| Time | Team | Play | Score |
| 29:25 |  | D. Beams Goal | 141 - 87 |
| 28:16 |  | J. Simpkin Behind | 141 - 81 |
| 26:35 | | M. Robinson Behind | 140 - 81 |
| 25:18 | | L. McDonald Goal | 140 - 80 |
| 24:19 | | B. Jacobs Goal | 134 - 80 |
| 21:17 | | B. Cunnington Goal | 128 - 80 |
| 18:40 | | D. Beams Goal | 122 - 80 |
| 15:19 | | D. Zorko Goal | 122 - 74 |
| 12:28 | | D. Beams Goal | 122 - 68 |
| 10:58 | | D. Zorko Behind | 122 - 62 |
| 8:21 | | J. Ziebell Goal | 122 - 61 |
| 5:53 | | J. Ziebell Goal | 116 - 61 |
| 3:35 | | D. Beams Goal | 110 - 61 |
| 2:19 | | C. Rayner Behind | 110 - 55 |
| 1:11 | | D. Zorko Behind | 110 - 54 |
| third Quarter | |||
| Time | Team | Play | Score |
| 31:33 | | S. Higgins Goal | 110 - 53 |
| 30:37 | | Rushed | 104 - 53 |
| 28:41 | | L. Taylor Goal | 103 - 53 |
| 27:39 | | Rushed | 103 - 47 |
| 25:59 | | O. McInerney Behind | 103 - 46 |
| 24:24 | | R. Tarrant Goal | 103 - 45 |
| 17:30 | | B. Keays Goal | 97 - 45 |
| 15:40 | | J. Simpkin Behind | 97 - 39 |
| 13:26 | | Rushed | 96 - 39 |
| 12:26 | | L. McDonald Behind | 95 - 39 |
| 10:50 | | D. McStay Goal | 94 - 39 |
| 10:10 | | Rushed | 94 - 33 |
| 9:05 | | T. Cutler Behind | 93 - 33 |
| 5:30 | | D. McStay Goal | 93 - 32 |
| 3:53 | | B. Hartung Goal | 93 - 26 |
| 1:22 | | J. Ziebell Goal | 87 - 26 |
| second Quarter | |||
| Time | Team | Play | Score |
| 30:51 | | S. Wright Goal | 81 - 26 |
| 26:19 | | M. Williams Goal | 75 - 26 |
| 24:29 | | C. Rayner Behind | 69 - 26 |
| 21:27 | | Z. Bailey Goal | 69 - 25 |
| 19:49 | | S. Wright Goal | 69 - 19 |
| 18:37 | | E. Hipwood Behind | 63 - 19 |
| 15:33 | | Rushed | 63 - 18 |
| 14:00 | | S. Atley Goal | 62 - 18 |
| 13:22 | | J. Ziebell Behind | 56 - 18 |
| 12:24 | | D. Beams Goal | 55 - 18 |
| 10:43 | | Rushed | 55 - 12 |
| 7:32 | | B. Jacobs Goal | 55 - 11 |
| 5:42 | | D. Beams Behind | 49 - 11 |
| 4:29 | | T. Goldstein Goal | 49 - 10 |
| 2:20 | | O. McInerney Goal | 43 - 10 |
| 0:53 | | B. Brown Goal | 43 - 4 |
| first Quarter | |||
| Time | Team | Play | Score |
| 25:38 | | B. Keays Behind | 37 - 4 |
| 23:38 | | L. McDonald Goal | 37 - 3 |
| 21:47 | | J. Ziebell Behind | 31 - 3 |
| 19:59 | | B. Brown Goal | 30 - 3 |
| 17:31 | | Rushed | 24 - 3 |
| 16:49 | | Rushed | 23 - 3 |
| 15:51 | | J. Simpkin Goal | 22 - 3 |
| 15:04 | | J. Simpkin Behind | 16 - 3 |
| 11:10 | | Rushed | 15 - 3 |
| 10:11 | | D. McStay Behind | 14 - 3 |
| 8:49 | | S. Atley Goal | 14 - 2 |
| 6:11 | | E. Hipwood Behind | 8 - 2 |
| 4:46 | | D. McStay Behind | 8 - 1 |
| 3:36 | | J. Anderson Behind | 8 - 0 |
| 1:25 | | M. Wood Goal | 7 - 0 |
| 0:54 | | M. Wood Behind | 1 - 0 |
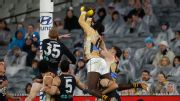
Mabior Chol flies high to take a monster grab before converting in the wet against Carlton.
The Hawthorn forward gives his side the lead on a rain-soaked MCG.
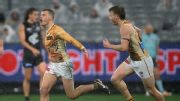
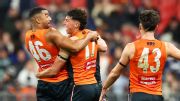
Finn Callaghan ices the game with the sealer as the Giants storm home to stun the Cats.
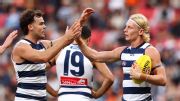
Geelong's Ollie Dempsey kicks three first-quarter goals, with his third coming after a Mark of the Year contender.
Zak Butters was forced to leave the game after suffering an injury late in the third quarter against St Kilda
Tristan Xerri shows off his versatility, finishing a brilliant passage of play with a goal to cut Collingwood's lead before three-quarter time.
| POS | Team | Pts. | % | Form |
|---|---|---|---|---|
| 1 |
 FRE FRE
|
60 | 142.3 | WWWLW |
| 2 |
 SYD SYD
|
52 | 131.2 | WWLWL |
| 3 |
 HAW HAW
|
46 | 114.2 | LWWLW |
| 4 |
 ADEL ADEL
|
44 | 116.9 | WWLWW |
| 5 |
 BL BL
|
40 | 111.7 | LWWWW |
| 6 |
 MELB MELB
|
40 | 106.3 | LWWLW |
| 7 |
 COLL COLL
|
38 | 104.4 | LWWWW |
| 8 |
 GEEL GEEL
|
36 | 115.2 | LWLLL |
| 9 |
 WB WB
|
36 | 90.8 | WWLWL |
| 10 |
 STK STK
|
32 | 106.1 | LWLWW |
| 11 |
 GWS GWS
|
32 | 101.6 | LLLWW |
| 12 |
 CARL CARL
|
32 | 91.9 | WWWWL |
| 13 |
 NMFC NMFC
|
32 | 91.4 | WWWLL |
| 14 |
 SUNS SUNS
|
28 | 95.6 | LLLLL |
| 15 |
 PORT PORT
|
24 | 101.3 | LLWWL |
| 16 |
 WCE WCE
|
16 | 71.5 | WLLLL |
| 17 |
 RICH RICH
|
8 | 63.3 | LLLLL |
| 18 |
 ESS ESS
|
4 | 69.0 | LLLLL |