


Game Information
Adelaide Oval
| fourth Quarter | |||
|---|---|---|---|
| Time | Team | Play | Score |
| 29:45 |  | T. Rockliff Goal | 132 - 75 |
| 25:08 | | C. Wingard Behind | 126 - 75 |
| 22:35 | | D. Houston Goal | 125 - 75 |
| 20:26 |  | P. Lipinski Goal | 119 - 75 |
| 18:46 | | S. Gray Goal | 119 - 69 |
| 13:53 | | R. Gray Goal | 113 - 69 |
| 12:11 | | R. Gray Behind | 107 - 69 |
| 11:06 | | T. Rockliff Behind | 106 - 69 |
| 9:39 | | T. McLean Goal | 105 - 69 |
| 7:13 | | R. Gray Goal | 105 - 63 |
| 5:59 | | B. Gowers Goal | 99 - 63 |
| 4:30 | | J. Schache Behind | 99 - 57 |
| 2:47 | | P. Ryder Goal | 99 - 56 |
| 0:35 | | Rushed | 93 - 56 |
| third Quarter | |||
| Time | Team | Play | Score |
| 30:22 | | T. Rockliff Goal | 93 - 55 |
| 28:26 | | M. Bontempelli Goal | 87 - 55 |
| 27:16 | | C. Dixon Behind | 87 - 49 |
| 26:50 | | B. Gowers Behind | 86 - 49 |
| 25:03 | | T. Boak Goal | 86 - 48 |
| 23:19 | | J. Westhoff Behind | 80 - 48 |
| 21:32 | | T. Boak Behind | 79 - 48 |
| 19:22 | | M. Wallis Goal | 78 - 48 |
| 16:38 | | J. Schache Goal | 78 - 42 |
| 15:09 | | J. Westhoff Goal | 78 - 36 |
| 12:06 | | T. Rockliff Goal | 72 - 36 |
| 7:38 | | J. Westhoff Goal | 66 - 36 |
| 6:32 | | J. Polec Goal | 60 - 36 |
| 4:11 | | M. Bontempelli Behind | 54 - 36 |
| 0:54 | | M. Wallis Goal | 54 - 35 |
| second Quarter | |||
| Time | Team | Play | Score |
| 33:27 | | C. Dixon Goal | 54 - 29 |
| 31:33 | | Rushed | 48 - 29 |
| 28:03 | | E. Richards Goal | 47 - 29 |
| 27:09 | | Rushed | 47 - 23 |
| 25:39 | | S. Motlop Goal | 47 - 22 |
| 17:58 | | B. Williams Behind | 41 - 22 |
| 15:53 | | E. Richards Goal | 41 - 21 |
| 12:33 | | M. Honeychurch Behind | 41 - 15 |
| 10:45 | | R. Gray Goal | 41 - 14 |
| 8:04 | | M. Bontempelli Goal | 35 - 14 |
| 5:35 | | E. Richards Goal | 35 - 8 |
| 0:20 | | J. Schache Behind | 35 - 2 |
| first Quarter | |||
| Time | Team | Play | Score |
| 28:51 | | C. Dixon Behind | 35 - 1 |
| 23:10 | | L. Thomas Behind | 34 - 1 |
| 21:45 | | C. Dixon Goal | 33 - 1 |
| 19:41 | | L. Thomas Goal | 27 - 1 |
| 16:01 | | O. Wines Goal | 21 - 1 |
| 13:24 | | J. Polec Goal | 15 - 1 |
| 11:34 | | T. Marshall Behind | 9 - 1 |
| 10:32 | | T. Marshall Behind | 8 - 1 |
| 8:48 | | C. Dixon Goal | 7 - 1 |
| 7:35 | | S. Gray Behind | 1 - 1 |
| 2:26 | | B. Gowers Behind | 0 - 1 |
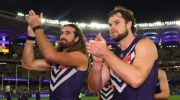
Coming off a loss to the Giants last week and goalless at halftime against the Swans, Fremantle needed a response. Well, the Dockers orchestrated an onslaught that should have the competition worried, writes Rohan Connolly.
Round 18 of the 2026 AFL season kicks off with a Thursday night cracker between the top two teams on the ladder as Fremantle host Sydney at Optus Stadium.
Mason Cox proposes a radical new twist to the deliberate rushed behind rule that would completely change late-game tactics.
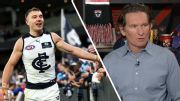
On ESPN Footy Central, James Hird makes the case Carlton's strong clearance and contest game could trouble the Hawks, as the Blues look to win an eighth-straight win.
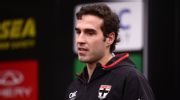
Max King's long-awaited football comeback is imminent and a St Kilda meeting later this week will give more clarity on when he might return in the AFL.
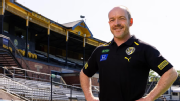
Richmond's ongoing injury crisis has led to their high performance boss leaving the club after less than two years in charge.
| POS | Team | Pts. | % | Form |
|---|---|---|---|---|
| 1 |
 FRE FRE
|
60 | 142.3 | WWWLW |
| 2 |
 SYD SYD
|
52 | 131.2 | WWLWL |
| 3 |
 HAW HAW
|
42 | 110.0 | WLWWL |
| 4 |
 BL BL
|
40 | 111.7 | LWWWW |
| 5 |
 ADEL ADEL
|
40 | 111.4 | WWWLW |
| 6 |
 MELB MELB
|
40 | 106.3 | LWWLW |
| 7 |
 GEEL GEEL
|
36 | 117.1 | LLWLL |
| 8 |
 WB WB
|
36 | 90.8 | WWLWL |
| 9 |
 COLL COLL
|
34 | 104.4 | LLWWW |
| 10 |
 CARL CARL
|
32 | 96.0 | WWWWW |
| 11 |
 NMFC NMFC
|
32 | 91.1 | LWWWL |
| 12 |
 STK STK
|
28 | 105.5 | LLWLW |
| 13 |
 GWS GWS
|
28 | 100.8 | WLLLW |
| 14 |
 SUNS SUNS
|
28 | 100.7 | LLLLL |
| 15 |
 PORT PORT
|
24 | 102.5 | WLLWW |
| 16 |
 WCE WCE
|
16 | 71.5 | WLLLL |
| 17 |
 RICH RICH
|
8 | 63.3 | LLLLL |
| 18 |
 ESS ESS
|
4 | 69.0 | LLLLL |