


Game Information
Marvel Stadium
| fourth Quarter | |||
|---|---|---|---|
| Time | Team | Play | Score |
| 34:56 |  | Rushed | 75 - 89 |
| 28:29 |  | L. O'Brien Behind | 75 - 88 |
| 27:14 | | E. Betts Goal | 74 - 88 |
| 26:46 | | J. Hopper Behind | 68 - 88 |
| 25:14 | | C. Ward Goal | 68 - 87 |
| 23:41 | | Z. Fisher Goal | 68 - 81 |
| 19:55 | | T. Taranto Behind | 62 - 81 |
| 18:30 | | L. Casboult Goal | 62 - 80 |
| 16:07 | | S. Coniglio Behind | 56 - 80 |
| 13:04 | | S. Coniglio Behind | 56 - 79 |
| 9:22 | | H. Himmelberg Goal | 56 - 78 |
| 7:06 | | T. Greene Behind | 56 - 72 |
| 5:16 | | C. Ward Goal | 56 - 71 |
| 3:15 | | Rushed | 56 - 65 |
| 1:57 | | E. Curnow Goal | 56 - 64 |
| 0:18 | | P. Dow Behind | 50 - 64 |
| third Quarter | |||
| Time | Team | Play | Score |
| 28:48 | | E. Curnow Goal | 49 - 64 |
| 26:24 | | T. Taranto Behind | 43 - 64 |
| 24:08 | | Rushed | 43 - 63 |
| 22:46 | | T. Taranto Behind | 43 - 62 |
| 20:04 | | T. Taranto Behind | 43 - 61 |
| 17:30 | | J. Hogan Goal | 43 - 60 |
| 13:53 | | X. O'Halloran Goal | 43 - 54 |
| 11:46 | | J. Kelly Behind | 43 - 48 |
| 7:52 | | Rushed | 43 - 47 |
| 4:40 | | Z. Sproule Goal | 42 - 47 |
| second Quarter | |||
| Time | Team | Play | Score |
| 31:35 | | T. Greene Goal | 42 - 41 |
| 29:34 | | J. Hogan Goal | 42 - 35 |
| 26:59 | | M. McGovern Goal | 42 - 29 |
| 23:41 | | H. Perryman Goal | 36 - 29 |
| 21:42 | | J. Hopper Goal | 36 - 23 |
| 16:50 | | E. Betts Goal | 36 - 17 |
| 13:56 | | Rushed | 30 - 17 |
| 10:58 | | S. Walsh Behind | 29 - 17 |
| 7:43 | | L. Casboult Goal | 28 - 17 |
| 5:16 | | J. Hogan Goal | 22 - 17 |
| 3:01 | | E. Curnow Goal | 22 - 11 |
| 2:26 | | C. Ward Behind | 16 - 11 |
| 0:22 | | T. Greene Behind | 16 - 10 |
| first Quarter | |||
| Time | Team | Play | Score |
| 29:16 | | L. O'Brien Behind | 16 - 9 |
| 27:39 | | D. Lloyd Goal | 15 - 9 |
| 24:38 | | C. Curnow Behind | 15 - 3 |
| 21:13 | | D. Lloyd Behind | 14 - 3 |
| 17:54 | | C. Durdin Goal | 14 - 2 |
| 15:42 | | J. Hogan Behind | 8 - 2 |
| 13:17 | | Rushed | 8 - 1 |
| 11:45 | | E. Curnow Goal | 7 - 1 |
| 4:09 | | T. Greene Behind | 1 - 1 |
| 0:23 | | A. Saad Behind | 1 - 0 |
Murphy Reid converts a brilliant play with a long solo run ending with a long-range goal from outside the arc.
The Demons weren't able to stop Shannon Neale as he kicked three straight goals early in the game.
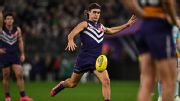
Jye Amiss kicked five goals and Murphy Reid produced a third-quarter clinic as Fremantle continued their western derby dominance with a 70-point win over West Coast at Optus Stadium.
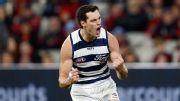
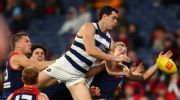
Melbourne's MCG golden run is over, losing to rejuvenated Geelong by 20 points.
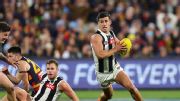
Nick Daicos kicks truly on the run to widen the margin for Collingwood.
The Dees have already exceeded expectations in Steven King's first season, but beating the Cats could prove they're genuine flag contenders and not just a great story, writes Rohan Connolly.
| POS | Team | Pts. | % | Form |
|---|---|---|---|---|
| 1 |
 FRE FRE
|
68 | 146.0 | WLWWW |
| 2 |
 SYD SYD
|
52 | 128.3 | WLWLL |
| 3 |
 HAW HAW
|
50 | 118.4 | WWLWW |
| 4 |
 BL BL
|
48 | 117.8 | WWWWW |
| 5 |
 ADEL ADEL
|
48 | 113.7 | LWWWL |
| 6 |
 MELB MELB
|
48 | 107.8 | LWWWL |
| 7 |
 COLL COLL
|
46 | 107.6 | WWWWW |
| 8 |
 GEEL GEEL
|
44 | 116.5 | LLLWW |
| 9 |
 WB WB
|
44 | 93.2 | LWLWW |
| 10 |
 STK STK
|
32 | 104.0 | WLWWL |
| 11 |
 GWS GWS
|
32 | 101.3 | LLWWL |
| 12 |
 CARL CARL
|
32 | 91.1 | WWWLL |
| 13 |
 NMFC NMFC
|
32 | 90.9 | WWLLL |
| 14 |
 SUNS SUNS
|
28 | 95.3 | LLLLL |
| 15 |
 PORT PORT
|
24 | 99.3 | LWWLL |
| 16 |
 WCE WCE
|
16 | 70.1 | LLLLL |
| 17 |
 ESS ESS
|
8 | 67.9 | LLLLW |
| 18 |
 RICH RICH
|
8 | 61.7 | LLLLL |