
Game Information
TIO Traeger Park
| fourth Quarter | |||
|---|---|---|---|
| Time | Team | Play | Score |
| 25:01 |  | A. Neal-Bullen Behind | 45 - 47 |
| 23:02 |  | J. Kelly Goal | 44 - 47 |
| 21:45 | | T. Sparrow Behind | 44 - 41 |
| 15:49 | | J. Viney Behind | 43 - 41 |
| 7:28 | | J. Riccardi Behind | 42 - 41 |
| 3:41 | | E. Langdon Goal | 42 - 40 |
| third Quarter | |||
| Time | Team | Play | Score |
| 23:30 | | B. Brown Behind | 36 - 40 |
| 21:16 | | Rushed | 35 - 40 |
| 16:40 | | K. Pickett Goal | 34 - 40 |
| 14:59 | | B. Grundy Goal | 28 - 40 |
| 12:28 | | I. Cumming Goal | 22 - 40 |
| 8:07 | | J. Kelly Goal | 22 - 34 |
| 6:33 | | X. O'Halloran Goal | 22 - 28 |
| 4:36 | | F. Callaghan Behind | 22 - 22 |
| 1:35 | | K. Pickett Behind | 22 - 21 |
| second Quarter | |||
| Time | Team | Play | Score |
| 29:49 | | T. Greene Behind | 21 - 21 |
| 24:31 | | T. Greene Goal | 21 - 20 |
| 21:35 | | C. Brown Behind | 21 - 14 |
| 20:53 | | T. Sparrow Behind | 21 - 13 |
| 18:00 | | L. Hunter Behind | 20 - 13 |
| 15:48 | | C. Petracca Behind | 19 - 13 |
| 9:08 | | Rushed | 18 - 13 |
| 7:05 | | J. Bowey Goal | 18 - 12 |
| 4:31 | | C. Petracca Behind | 12 - 12 |
| 3:10 | | T. Greene Goal | 11 - 12 |
| first Quarter | |||
| Time | Team | Play | Score |
| 25:44 | | C. Petracca Behind | 11 - 6 |
| 24:02 | | L. Hunter Behind | 10 - 6 |
| 19:40 | | J. Melksham Goal | 9 - 6 |
| 9:45 | | C. Brown Goal | 3 - 6 |
| 5:40 | | C. Petracca Behind | 3 - 0 |
| 3:44 | | K. Pickett Behind | 2 - 0 |
| 1:21 | | B. Fritsch Behind | 1 - 0 |
Port youngster Joe Berry finds some space after a slick move before kicking a nice goal against the Dockers.
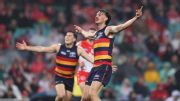
Zac Taylor's run-down tackle gives Luke Nankervis the opportunity to extend Adelaide's lead late in the final term in the win over Sydney.
Chad Warner takes flights on the SCG for an impressive mark against the Adelaide Crows
Craig McRae can see a "Collingwood flavour" at Carlton since Josh Fraser became interim coach.
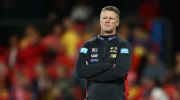
Gold Coast coach Damien Hardwick has apologised to his players for an "overly emotional" reaction when he declared the Suns' season shot.
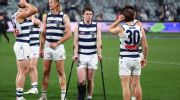
Geelong star Max Holmes is set for an extended stint on the sidelines as he prepares to have surgery on a badly injured ankle.
| POS | Team | Pts. | % | Form |
|---|---|---|---|---|
| 1 |
 FRE FRE
|
60 | 142.3 | WWWLW |
| 2 |
 SYD SYD
|
52 | 128.3 | WLWLL |
| 3 |
 ADEL ADEL
|
48 | 117.2 | WLWWW |
| 4 |
 HAW HAW
|
46 | 114.2 | LWWLW |
| 5 |
 BL BL
|
44 | 117.1 | WWWWW |
| 6 |
 MELB MELB
|
44 | 109.0 | WWLWW |
| 7 |
 GEEL GEEL
|
40 | 116.2 | WLLLW |
| 8 |
 WB WB
|
40 | 92.3 | WLWLW |
| 9 |
 COLL COLL
|
38 | 104.4 | LWWWW |
| 10 |
 STK STK
|
32 | 104.0 | WLWWL |
| 11 |
 GWS GWS
|
32 | 101.6 | LLLWW |
| 12 |
 CARL CARL
|
32 | 91.9 | WWWWL |
| 13 |
 NMFC NMFC
|
32 | 91.4 | WWWLL |
| 14 |
 SUNS SUNS
|
28 | 95.6 | LLLLL |
| 15 |
 PORT PORT
|
24 | 101.3 | LLWWL |
| 16 |
 WCE WCE
|
16 | 72.0 | LLLLL |
| 17 |
 RICH RICH
|
8 | 63.0 | LLLLL |
| 18 |
 ESS ESS
|
4 | 66.6 | LLLLL |