


Game Information
Adelaide Oval
| fourth Quarter | |||
|---|---|---|---|
| Time | Team | Play | Score |
| 24:13 |  | K. Farrell Goal | 89 - 51 |
| 20:25 |  | J. Harbrow Behind | 83 - 51 |
| 17:44 | | B. Frampton Goal | 83 - 50 |
| 16:07 | | C. Rozee Goal | 77 - 50 |
| 7:28 | | K. Amon Behind | 71 - 50 |
| 4:45 | | K. Farrell Goal | 70 - 50 |
| 0:42 | | S. Motlop Behind | 64 - 50 |
| third Quarter | |||
| Time | Team | Play | Score |
| 26:48 | | C. Rozee Goal | 63 - 50 |
| 25:32 | | S. Motlop Goal | 57 - 50 |
| 24:08 | | Z. Butters Behind | 51 - 50 |
| 23:39 | | S. Gray Behind | 50 - 50 |
| 16:44 | | T. Boak Behind | 49 - 50 |
| 14:38 | | P. Ryder Behind | 48 - 50 |
| 11:43 | | J. Corbett Behind | 47 - 50 |
| 10:13 | | P. Wright Goal | 47 - 49 |
| 6:46 | | B. Frampton Behind | 47 - 43 |
| 3:36 | | Rushed | 46 - 43 |
| 1:28 | | B. Frampton Goal | 45 - 43 |
| second Quarter | |||
| Time | Team | Play | Score |
| 28:59 | | B. Ainsworth Goal | 39 - 43 |
| 25:55 | | W. Powell Behind | 39 - 37 |
| 22:09 | | S. Gray Goal | 39 - 36 |
| 17:58 | | J. Bowes Goal | 33 - 36 |
| 15:51 | | P. Ryder Goal | 33 - 30 |
| 13:45 | | A. Sexton Behind | 27 - 30 |
| 10:49 | | Rushed | 27 - 29 |
| 7:12 | | J. Corbett Behind | 26 - 29 |
| 2:52 | | Z. Butters Behind | 26 - 28 |
| 1:31 | | Z. Butters Goal | 25 - 28 |
| first Quarter | |||
| Time | Team | Play | Score |
| 30:42 | | J. Martin Goal | 19 - 28 |
| 29:22 | | B. Fiorini Behind | 19 - 22 |
| 24:45 | | B. Ainsworth Behind | 19 - 21 |
| 23:20 | | K. Amon Goal | 19 - 20 |
| 21:44 | | A. Miles Behind | 13 - 20 |
| 19:59 | | A. Sexton Goal | 13 - 19 |
| 17:48 | | K. Farrell Goal | 13 - 13 |
| 17:06 | | X. Duursma Behind | 7 - 13 |
| 15:37 | | A. Sexton Goal | 6 - 13 |
| 11:52 | | D. Swallow Behind | 6 - 7 |
| 8:44 | | B. Frampton Goal | 6 - 6 |
| 6:50 | | B. Fiorini Goal | 0 - 6 |
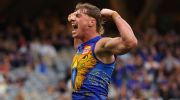
West Coast coach Andrew McQualter has declared the sky is the limit for Harley Reid after the star midfielder willed his team to an upset 17-point win over GWS at Optus Stadium.
The Coleman Medal is awarded to the player who kicks the most goals throughout the AFL home and away season. Who is on track to win the award in 2026?
Brad Scott has lamented a horrid start and put the heat on Essendon's more experienced players after Fremantle equalled a club record.
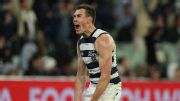
Rowan Marshall kicks the long-range sealer from an extremely tight angle at Marvel Stadium.
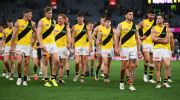
Richmond are confident the worst of their injury crisis is behind them and they will avoid having to call up VFL-listed top-up players despite suffering yet another blow in their 36-point loss to St Kilda.
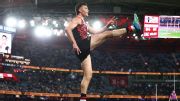
Christopher Scerri loads up from 50 metres out and kicks the first goal of his AFL career.
| POS | Team | Pts. | % | Form |
|---|---|---|---|---|
| 1 |
 SYD SYD
|
36 | 152.2 | WWWWW |
| 2 |
 FRE FRE
|
36 | 134.9 | WWWWW |
| 3 |
 GEEL GEEL
|
28 | 123.5 | WLWWW |
| 4 |
 SUNS SUNS
|
28 | 119.9 | WLWWW |
| 5 |
 MELB MELB
|
28 | 107.6 | WWLWW |
| 6 |
 HAW HAW
|
26 | 110.2 | WWDLL |
| 7 |
 BL BL
|
24 | 116.6 | LWWWL |
| 8 |
 ADEL ADEL
|
24 | 109.7 | WLWWW |
| 9 |
 STK STK
|
20 | 112.8 | LWWLW |
| 10 |
 WB WB
|
20 | 91.7 | LLLWL |
| 11 |
 COLL COLL
|
18 | 99.1 | WWDLL |
| 12 |
 NMFC NMFC
|
16 | 96.7 | WLLLL |
| 13 |
 GWS GWS
|
16 | 90.1 | LWLWL |
| 14 |
 PORT PORT
|
12 | 105.2 | LWLLL |
| 15 |
 WCE WCE
|
12 | 64.2 | LLLLW |
| 16 |
 CARL CARL
|
8 | 81.8 | LLLLW |
| 17 |
 ESS ESS
|
4 | 70.6 | LLLLL |
| 18 |
 RICH RICH
|
4 | 60.9 | LLWLL |