
Game Information
MCG
| fourth Quarter | |||
|---|---|---|---|
| Time | Team | Play | Score |
| 30:00 |  | C. Oliver Goal | 123 - 86 |
| 26:47 | | C. Oliver Goal | 117 - 86 |
| 25:42 |  | B. Cunnington Goal | 111 - 86 |
| 23:17 | | N. Jones Goal | 111 - 80 |
| 21:27 | | J. Ziebell Goal | 105 - 80 |
| 19:42 | | T. Bugg Goal | 105 - 74 |
| 16:35 | | S. Higgins Behind | 99 - 74 |
| 13:24 | | J. Garlett Goal | 99 - 73 |
| 11:39 | | J. Waite Goal | 93 - 73 |
| 9:13 | | N. Jones Behind | 93 - 67 |
| 5:21 | | D. Tyson Behind | 92 - 67 |
| 3:11 | | Rushed | 91 - 67 |
| 1:56 | | J. Lewis Goal | 91 - 66 |
| third Quarter | |||
| Time | Team | Play | Score |
| 28:48 | | D. Kent Goal | 85 - 66 |
| 28:08 | | D. Kent Behind | 79 - 66 |
| 22:30 | | J. Garlett Goal | 78 - 66 |
| 17:32 | | J. Hogan Behind | 72 - 66 |
| 13:21 | | B. Brown Goal | 71 - 66 |
| 12:06 | | Rushed | 71 - 60 |
| 10:19 | | B. Brown Goal | 70 - 60 |
| 8:53 | | J. Waite Behind | 70 - 54 |
| 8:05 | | D. Kent Behind | 70 - 53 |
| 7:06 | | C. Salem Behind | 69 - 53 |
| 5:37 | | J. Garlett Behind | 68 - 53 |
| 2:33 | | D. Kent Goal | 67 - 53 |
| 1:22 | | B. Brown Behind | 61 - 53 |
| second Quarter | |||
| Time | Team | Play | Score |
| 32:34 | | T. Bugg Behind | 61 - 52 |
| 27:50 | | B. Brown Goal | 60 - 52 |
| 25:05 | | J. Simpkin Goal | 60 - 46 |
| 23:29 | | J. Hogan Behind | 60 - 40 |
| 21:56 | | C. Petracca Goal | 59 - 40 |
| 20:25 | | T. Bugg Goal | 53 - 40 |
| 17:30 | | J. Melksham Behind | 47 - 40 |
| 16:55 | | S. Atley Behind | 46 - 40 |
| 13:29 | | J. Garlett Goal | 46 - 39 |
| 11:53 | | J. Hogan Goal | 40 - 39 |
| 9:12 | | B. Hartung Goal | 34 - 39 |
| 8:15 | | C. Petracca Behind | 34 - 33 |
| 5:43 | | J. Melksham Behind | 33 - 33 |
| 3:57 | | B. Vince Goal | 32 - 33 |
| 2:03 | | B. Fritsch Goal | 26 - 33 |
| first Quarter | |||
| Time | Team | Play | Score |
| 28:43 | | T. Bugg Goal | 20 - 33 |
| 26:37 | | J. Ziebell Behind | 14 - 33 |
| 23:15 | | J. Ziebell Behind | 14 - 32 |
| 22:22 | | T. Goldstein Goal | 14 - 31 |
| 21:26 | | N. Hrovat Behind | 14 - 25 |
| 19:43 | | Rushed | 14 - 24 |
| 18:48 | | J. Wagner Behind | 13 - 24 |
| 16:34 | | D. Kent Goal | 12 - 24 |
| 14:51 | | T. Bugg Goal | 6 - 24 |
| 13:14 | | J. Waite Goal | 0 - 24 |
| 10:41 | | B. Brown Goal | 0 - 18 |
| 7:10 | | J. Waite Goal | 0 - 12 |
| 3:33 | | B. Cunnington Goal | 0 - 6 |
Josh Rachele slots a late goal from distance to seal the victory for the Adelaide Crows.
The Coleman Medal is awarded to the player who kicks the most goals throughout the AFL home and away season. Who is on track to win the award in 2026?
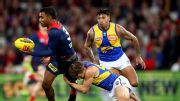
Kysaiah Pickett collects Jake Waterman high and is likely to face MRO scrutiny during the week.
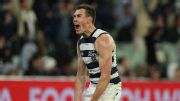
In his 432nd game, Scott Pendlebury gets on the scoreboard with a set shot from straight in front.
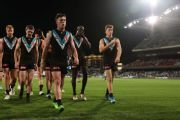
Port Adelaide superstar Zak Butters has avoided an AFL suspension, keeping him in Brownlow Medal contention.
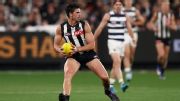
Sam Durham provides the clever tap that leads to a Darcy Parish goal.
| POS | Team | Pts. | % | Form |
|---|---|---|---|---|
| 1 |
 SYD SYD
|
32 | 157.2 | WWWWW |
| 2 |
 FRE FRE
|
32 | 131.6 | WWWWW |
| 3 |
 HAW HAW
|
26 | 116.8 | WWWDL |
| 4 |
 BL BL
|
24 | 124.5 | WLWWW |
| 5 |
 GEEL GEEL
|
24 | 120.4 | WWLWW |
| 6 |
 SUNS SUNS
|
24 | 118.5 | LWLWW |
| 7 |
 MELB MELB
|
20 | 100.2 | WLWWL |
| 8 |
 WB WB
|
20 | 92.4 | LLLLW |
| 9 |
 COLL COLL
|
18 | 99.9 | LWWDL |
| 10 |
 STK STK
|
16 | 109.3 | WLWWL |
| 11 |
 NMFC NMFC
|
16 | 104.4 | LWLLL |
| 12 |
 ADEL ADEL
|
16 | 96.6 | LWWLW |
| 13 |
 GWS GWS
|
16 | 91.1 | WLWLW |
| 14 |
 PORT PORT
|
12 | 109.5 | LLWLL |
| 15 |
 WCE WCE
|
8 | 59.3 | LLLLL |
| 16 |
 CARL CARL
|
4 | 79.3 | LLLLL |
| 17 |
 ESS ESS
|
4 | 71.8 | WLLLL |
| 18 |
 RICH RICH
|
4 | 60.0 | LLLLW |