


Game Information
Marvel Stadium
| fourth Quarter | |||
|---|---|---|---|
| Time | Team | Play | Score |
| 25:10 |  | Rushed | 93 - 67 |
| 22:00 | | K. Lambert Goal | 92 - 67 |
| 20:24 | | J. Riewoldt Behind | 86 - 67 |
| 14:58 | | T. Cotchin Behind | 85 - 67 |
| 13:58 | | S. Edwards Goal | 84 - 67 |
| 12:26 | | K. Lambert Goal | 78 - 67 |
| 6:16 | | T. Cotchin Behind | 72 - 67 |
| 0:45 |  | L. Franklin Goal | 71 - 67 |
| third Quarter | |||
| Time | Team | Play | Score |
| 32:32 | | L. Franklin Goal | 71 - 61 |
| 30:02 | | W. Hayward Goal | 71 - 55 |
| 23:26 | | J. Riewoldt Goal | 71 - 49 |
| 20:52 | | J. Caddy Behind | 65 - 49 |
| 19:50 | | L. Parker Goal | 64 - 49 |
| 19:17 | | J. Riewoldt Behind | 64 - 43 |
| 17:26 | | J. Short Goal | 63 - 43 |
| 14:59 | | D. Martin Behind | 57 - 43 |
| 12:50 | | L. Parker Goal | 56 - 43 |
| 9:43 | | K. Lambert Goal | 56 - 37 |
| 5:13 | | J. Riewoldt Goal | 50 - 37 |
| 2:12 | | O. Florent Goal | 44 - 37 |
| second Quarter | |||
| Time | Team | Play | Score |
| 19:30 | | Rushed | 44 - 31 |
| 9:19 | | D. Butler Goal | 43 - 31 |
| 7:10 | | O. Florent Goal | 37 - 31 |
| 4:23 | | L. Franklin Goal | 37 - 25 |
| first Quarter | |||
| Time | Team | Play | Score |
| 36:11 | | J. Short Goal | 37 - 19 |
| 34:30 | | J. Caddy Goal | 31 - 19 |
| 31:55 | | D. Butler Goal | 25 - 19 |
| 29:33 | | T. McCartin Behind | 19 - 19 |
| 26:34 | | Rushed | 19 - 18 |
| 23:29 | | N. Vlastuin Goal | 18 - 18 |
| 14:40 | | D. Rioli Goal | 12 - 18 |
| 12:08 | | L. Franklin Goal | 6 - 18 |
| 10:07 | | J. Riewoldt Goal | 6 - 12 |
| 6:24 | | B. Ronke Goal | 0 - 12 |
| 5:16 | | B. Ronke Goal | 0 - 6 |
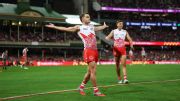
Logan McDonald puts the Swans up and Tom Papley delivers the dagger as the Swans win and stay top of the ladder.
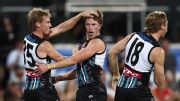
Port Adelaide speedster Ewan Mackinlay shrugs a tackle and takes two bounces before slotting a ripping goal against the Suns.
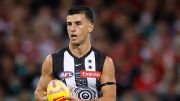
Collingwood star Nick Daicos reads the fall of the ball perfectly and slots a classy goal on his left foot.
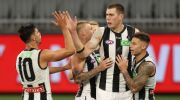
Mason Cox has come to the defence of the Scott Pendlebury, declaring criticism of the Collingwood veteran making money from his record-breaking 433rd game as "absurd" and "ridiculous".
Mason Cox passionately defends former teammate Scott Pendlebury amid criticism surrounding his record-breaking celebrations
Shaun Mannagh's five goals and 30 disposals lead Geelong to a 41-point thrashing over Brisbane at the Gabba in their Grand Final rematch
| POS | Team | Pts. | % | Form |
|---|---|---|---|---|
| 1 |
 SYD SYD
|
36 | 152.2 | WWWWW |
| 2 |
 FRE FRE
|
32 | 131.6 | WWWWW |
| 3 |
 GEEL GEEL
|
28 | 123.5 | WLWWW |
| 4 |
 SUNS SUNS
|
28 | 119.9 | WLWWW |
| 5 |
 HAW HAW
|
26 | 116.8 | WWWDL |
| 6 |
 BL BL
|
24 | 116.6 | LWWWL |
| 7 |
 MELB MELB
|
24 | 103.9 | LWWLW |
| 8 |
 ADEL ADEL
|
20 | 101.7 | WWLWW |
| 9 |
 WB WB
|
20 | 92.4 | LLLLW |
| 10 |
 COLL COLL
|
18 | 99.1 | WWDLL |
| 11 |
 STK STK
|
16 | 109.3 | WLWWL |
| 12 |
 NMFC NMFC
|
16 | 104.4 | LWLLL |
| 13 |
 GWS GWS
|
16 | 91.1 | WLWLW |
| 14 |
 PORT PORT
|
12 | 105.2 | LWLLL |
| 15 |
 WCE WCE
|
8 | 60.1 | LLLLL |
| 16 |
 CARL CARL
|
4 | 79.3 | LLLLL |
| 17 |
 ESS ESS
|
4 | 71.8 | WLLLL |
| 18 |
 RICH RICH
|
4 | 60.3 | LLLWL |