

Game Information
Marvel Stadium
| fourth Quarter | |||
|---|---|---|---|
| Time | Team | Play | Score |
| 32:17 |  | L. Collard Goal | 135 - 53 |
| 30:42 |  | T. Sonsie Behind | 129 - 53 |
| 29:11 | | M. Owens Goal | 129 - 52 |
| 26:21 | | S. Campbell Behind | 123 - 52 |
| 22:59 | | M. Owens Goal | 123 - 51 |
| 21:25 | | B. Hill Behind | 117 - 51 |
| 20:25 | | L. Collard Behind | 116 - 51 |
| 17:19 | | S. Lalor Behind | 115 - 51 |
| 15:22 | | M. Wood Goal | 115 - 50 |
| 12:56 | | D. Wilson Goal | 109 - 50 |
| 11:01 | | I. Keeler Goal | 103 - 50 |
| 9:44 | | J. Higgins Goal | 97 - 50 |
| 7:58 | | Rushed | 91 - 50 |
| 7:14 | | Z. Jones Behind | 91 - 49 |
| 4:55 | | M. Hall Goal | 90 - 49 |
| 1:34 | | H. Garcia Behind | 84 - 49 |
| 0:28 | | K. McIntosh Goal | 83 - 49 |
| third Quarter | |||
| Time | Team | Play | Score |
| 27:57 | | B. Hill Goal | 83 - 43 |
| 27:02 | | Rushed | 77 - 43 |
| 26:26 | | R. Mansell Behind | 76 - 43 |
| 26:09 | | T. Nankervis Behind | 76 - 42 |
| 24:21 | | M. Owens Goal | 76 - 41 |
| 21:26 | | T. Brown Goal | 70 - 41 |
| 19:34 | | M. Owens Goal | 70 - 35 |
| 16:17 | | L. Collard Behind | 64 - 35 |
| 14:49 | | C. Sharman Goal | 63 - 35 |
| 13:36 | | C. Sharman Behind | 57 - 35 |
| 12:28 | | C. Sharman Goal | 56 - 35 |
| 9:40 | | R. Marshall Goal | 50 - 35 |
| 7:02 | | M. Hall Behind | 44 - 35 |
| 5:20 | | M. Owens Behind | 43 - 35 |
| 3:58 | | S. Campbell Behind | 42 - 35 |
| second Quarter | |||
| Time | Team | Play | Score |
| 27:44 | | M. Wood Goal | 42 - 34 |
| 25:54 | | S. Campbell Goal | 36 - 34 |
| 24:02 | | J. Higgins Goal | 36 - 28 |
| 19:20 | | J. Higgins Goal | 30 - 28 |
| 17:10 | | M. Owens Behind | 24 - 28 |
| 15:48 | | T. Travaglia Behind | 23 - 28 |
| 14:45 | | I. Keeler Behind | 22 - 28 |
| 13:44 | | T. Nankervis Behind | 21 - 28 |
| 8:54 | | J. Bauer Goal | 21 - 27 |
| 5:53 | | S. Campbell Goal | 21 - 21 |
| 4:24 | | T. Lynch Goal | 21 - 15 |
| first Quarter | |||
| Time | Team | Play | Score |
| 27:40 | | M. Hall Goal | 21 - 9 |
| 25:06 | | T. Lynch Behind | 15 - 9 |
| 23:18 | | L. Collard Goal | 15 - 8 |
| 16:52 | | J. Ross Behind | 9 - 8 |
| 15:59 | | M. Windhager Behind | 9 - 7 |
| 13:01 | | T. Sonsie Behind | 8 - 7 |
| 11:38 | | M. Wood Goal | 8 - 6 |
| 10:35 | | M. Wood Behind | 2 - 6 |
| 8:39 | | H. Garcia Behind | 1 - 6 |
| 1:23 | | S. Campbell Goal | 0 - 6 |
Jake Stringer had one of the all-time stinkers in front of goal, and a young star needs to learn to beat the tag. Plus, how good is winning, Bombers fans?! Here's whose stocks are up and down after Round 19.
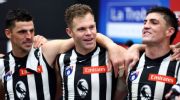
If you're another club with genuine flag aspirations, Collingwood won't be appearing anywhere on your September wish list.
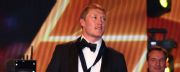
The Brownlow Medal is the highest individual honour in the AFL. In 2026, ESPN is giving you an advantage with our one-of-a-kind predictor.
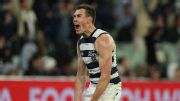
The Coleman Medal is awarded to the player who kicks the most goals throughout the AFL home and away season. Who is on track to win the award in 2026?
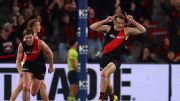
Mason Redman drifts forward and snaps through the Bombers' sixth consecutive goal.
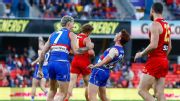
Ed Richards slots a nice banana from range for the Bulldogs.
| POS | Team | Pts. | % | Form |
|---|---|---|---|---|
| 1 |
 FRE FRE
|
64 | 142.0 | WWLWW |
| 2 |
 SYD SYD
|
52 | 128.3 | WLWLL |
| 3 |
 HAW HAW
|
50 | 118.4 | WWLWW |
| 4 |
 BL BL
|
48 | 117.8 | WWWWW |
| 5 |
 ADEL ADEL
|
48 | 117.2 | WLWWW |
| 6 |
 MELB MELB
|
48 | 109.6 | WLWWW |
| 7 |
 WB WB
|
44 | 93.2 | LWLWW |
| 8 |
 COLL COLL
|
42 | 105.6 | WWWWW |
| 9 |
 GEEL GEEL
|
40 | 116.2 | WLLLW |
| 10 |
 STK STK
|
32 | 104.0 | WLWWL |
| 11 |
 GWS GWS
|
32 | 101.3 | LLWWL |
| 12 |
 CARL CARL
|
32 | 91.1 | WWWLL |
| 13 |
 NMFC NMFC
|
32 | 90.9 | WWLLL |
| 14 |
 SUNS SUNS
|
28 | 95.3 | LLLLL |
| 15 |
 PORT PORT
|
24 | 99.3 | LWWLL |
| 16 |
 WCE WCE
|
16 | 72.1 | LLLLL |
| 17 |
 ESS ESS
|
8 | 67.9 | LLLLW |
| 18 |
 RICH RICH
|
8 | 61.7 | LLLLL |