Game Information
MCG
| fourth Quarter | |||
|---|---|---|---|
| Time | Team | Play | Score |
| 25:55 |  | T. Papley Behind | 78 - 87 |
| 22:10 | | J. Dawson Behind | 78 - 86 |
| 19:53 |  | N. Jones Goal | 78 - 85 |
| 19:12 | | J. Hogan Behind | 72 - 85 |
| 18:09 | | T. McDonald Goal | 71 - 85 |
| 12:40 | | A. Brayshaw Behind | 65 - 85 |
| 7:14 | | J. Garlett Behind | 64 - 85 |
| 6:13 | | J. Garlett Goal | 63 - 85 |
| 5:36 | | W. Hayward Behind | 57 - 85 |
| 2:51 | | Rushed | 57 - 84 |
| third Quarter | |||
| Time | Team | Play | Score |
| 29:53 | | T. Papley Goal | 56 - 84 |
| 26:23 | | C. Pedersen Goal | 56 - 78 |
| 25:20 | | L. Franklin Goal | 50 - 78 |
| 23:06 | | T. Papley Goal | 50 - 72 |
| 21:58 | | L. Franklin Behind | 50 - 66 |
| 18:37 | | L. Franklin Behind | 50 - 65 |
| 17:06 | | T. McDonald Goal | 50 - 64 |
| 15:28 | | L. Franklin Behind | 44 - 64 |
| 14:06 | | A. vandenBerg Goal | 44 - 63 |
| 12:27 | | T. McCartin Goal | 38 - 63 |
| 10:47 | | I. Heeney Goal | 38 - 57 |
| 6:31 | | Rushed | 38 - 51 |
| 5:54 | | Rushed | 37 - 51 |
| 4:06 | | A. vandenBerg Goal | 36 - 51 |
| 2:09 | | L. Franklin Goal | 30 - 51 |
| 0:41 | | L. Franklin Behind | 30 - 45 |
| second Quarter | |||
| Time | Team | Play | Score |
| 28:20 | | T. McDonald Behind | 30 - 44 |
| 25:14 | | C. Oliver Behind | 29 - 44 |
| 23:20 | | C. Spargo Behind | 28 - 44 |
| 21:45 | | Josh P. Kennedy Goal | 27 - 44 |
| 18:02 | | J. Dawson Goal | 27 - 38 |
| 14:28 | | Rushed | 27 - 32 |
| 12:55 | | D. Hannebery Goal | 26 - 32 |
| 11:46 | | I. Heeney Goal | 26 - 26 |
| 9:37 | | W. Hayward Goal | 26 - 20 |
| 6:34 | | H. Cunningham Goal | 26 - 14 |
| 5:24 | | D. Tyson Behind | 26 - 8 |
| 4:32 | | T. Papley Behind | 25 - 8 |
| 2:58 | | J. Hogan Goal | 25 - 7 |
| 1:31 | | J. Hogan Behind | 19 - 7 |
| first Quarter | |||
| Time | Team | Play | Score |
| 28:06 | | A. vandenBerg Goal | 18 - 7 |
| 26:03 | | C. Petracca Goal | 12 - 7 |
| 25:08 | | D. Tyson Behind | 6 - 7 |
| 21:02 | | J. Hogan Behind | 5 - 7 |
| 19:33 | | T. McDonald Behind | 4 - 7 |
| 17:20 | | T. Papley Goal | 3 - 7 |
| 13:19 | | L. Franklin Behind | 3 - 1 |
| 9:57 | | C. Oliver Behind | 3 - 0 |
| 9:02 | | C. Spargo Behind | 2 - 0 |
| 6:31 | | C. Petracca Behind | 1 - 0 |
AFL great Tony Modra has been seriously injured in a truck accident on his South Australian property.
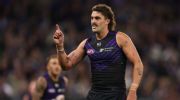
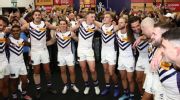
Star ruckman Luke Jackson has produced yet another match-winning display as Fremantle overcame a 28-point deficit to beat Geelong by nine points and extend their club-record winning run to 13 games.
Round 15 of the 2026 AFL season kicks off with a Thursday night blockbuster between Fremantle and Geelong. Then, on Friday, Gold Coast host Hawthorn at People First Stadium.
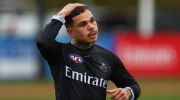
Bobby Hill is "truthfully, battling" and a long way off resuming his stalled AFL career, Collingwood coach Craig McRae has told reporters.
This week's Six Points feature Damien Hardwick's Geelong free kick theory, the league's most in form player, the five names I'd make Hall of Fame 'Legends', and yet more criticism of the AFL's fixture.
It's the biggest month of the year for the 2026 draft prospects, with the National Championships underway. So who are the names to keep an eye on? Here's Jasper Chellappah's AFL draft Power Rankings for June 2026.
| POS | Team | Pts. | % | Form |
|---|---|---|---|---|
| 1 |
 FRE FRE
|
52 | 144.4 | WWWWW |
| 2 |
 SYD SYD
|
48 | 143.7 | WLWWW |
| 3 |
 GEEL GEEL
|
36 | 120.6 | WLLWL |
| 4 |
 MELB MELB
|
36 | 105.7 | WLLWW |
| 5 |
 HAW HAW
|
34 | 113.2 | LLWWL |
| 6 |
 ADEL ADEL
|
32 | 112.4 | WWLWW |
| 7 |
 BL BL
|
32 | 108.4 | LLLWW |
| 8 |
 WB WB
|
32 | 90.7 | LWWWL |
| 9 |
 SUNS SUNS
|
28 | 107.2 | WWLLL |
| 10 |
 STK STK
|
24 | 102.4 | WLLLW |
| 11 |
 GWS GWS
|
24 | 102.3 | WLWWL |
| 12 |
 NMFC NMFC
|
24 | 88.5 | LLWLW |
| 13 |
 COLL COLL
|
22 | 99.2 | LLWLL |
| 14 |
 CARL CARL
|
20 | 88.7 | LWWWW |
| 15 |
 PORT PORT
|
16 | 101.0 | LLLWL |
| 16 |
 WCE WCE
|
16 | 72.7 | WLWLL |
| 17 |
 RICH RICH
|
8 | 61.1 | LLWLL |
| 18 |
 ESS ESS
|
4 | 70.4 | LLLLL |